{Client Feature Event} Fletchers Splash Pool Party

Splash Collage

I’ve been busting to share the photos from this gorgeous party for such a long time. Last year the gorgeous Gillian from Crumbs of Comfort Cake Design came to me armed with a brief and a few inspirational pics to develop an invitation for her sons ‘Splash’ 3rd Birthday Party. 

And so, with the element of ‘Bubbles’ in mind, together we developed to creative Fletchers invitation, party bags, welcome sign and backdrop and cookie art. Embedded within the design was my love for retro inspired typography. The colours were reflective of the ocean with a little bit of sunshine for good measure.

Gillian went to work on the gorgeous cake with Fletcher sliding into his pool. The the styling of the whole event was reflective of Gillians clean and modern approach, I love that she incorporated the folded towels into the beverage stand, bringing together the reflection of a true pool side party! The drink dispenser was simply green cordial, giving a boost of colour to the layout. Gillian made the cookies with edible transfers – a clever way of incorporating the creative onto the table.

Bubble garlands and bubble spoons (by our decor brand Red Elephant Creative) decorated the beverage station and buffet. The favour bags were also a part of the bespoke package by Penny Lane Studio.

Styling and Cakes by Crumbs of Comfort Cake Design

Photography is by the gorgeous Melinda from Musie J Photography.

For the printable artwork for this party, visit the Penny Lane Studio etsy store 

For party supplies including bubble garlands and bubble spoons visit the red elephant creative etsy store

487633_506044422777240_1800033053_n

splash collage 2
487633_506044426110573_773581949_n splash collage 3


Penny Lane Studio, a new place and a new face for Red Elephant Creative


Its been quite a journey that has been taken for me to reach the point that I write this blog post. A tale of true friendship and insomnia dreamt ideas and creations which has allowed me the opportunity to reach this point, a turning point in the blossoming tale of Penny Lane Studio.

Penny Lane is evolving as a place of beautiful celebrations and I am so excited to be updating you about the journey today.

What is Penny Lane Studio?…
The name Penny Lane is the brain child of a very special girlfriend and I. With her encouragement, is is the new place in which I will be evolving my ranges and designs. The name is reflective of my love for vintage, which undoubtedly influences my work and whilst I will still keep my original designs of paper garlands, printed spoons and tags under the red elephant creative name, they will eventually be made available on the Penny Lane site along with a range of other new and exciting pieces when we open our very own online store next year.

The Blog…
The initiation of this website will allow me (as promised to many of you) to start blogging a range of creative tutorials, inspiring parties and continue the event stylist interviews which I started on my other website redelephantcreative.com. For those who have been following us for a while, you may noticed I have also copied over the previous blog posts to our new home, just so we can ensure everyone has access to what we have to share, including the new followers of Penny Lane Studio.

The Products…
When we open our new store next year, we will be bringing to you a silver platter of Printables, handcrafted event decor and stationery, beautiful (and unique) supplies, red elephant creative products and more. Like a good wine takes time to age, bringing all of these pieces to one place will take a little while and so, we are really excited to have you join us from the beginning, as we evolve the website and build our dream as a one stop shop for beautifully handcrafted events.

In the meantime…
We are open for business!! Like our Facebook page to get the absolute latest news Facebook page. I am a very lucky girl. Penny Lane has actually had orders for quite some time now and so, I am already working with amazing creatives and helping them bring to life their vision with our bespoke designs for a range of weddings, birthday and christening celebrations. Contact us via our Facebook page or email us studio{@}pennylanestudio.com.au so see how we can bring YOUR vision to life!

Thank you for stopping by, we look forward to sharing lots of new and beautiful ideas with you really soon!

Nicole xo

Vibrant Spring colours bouncing from our studio table

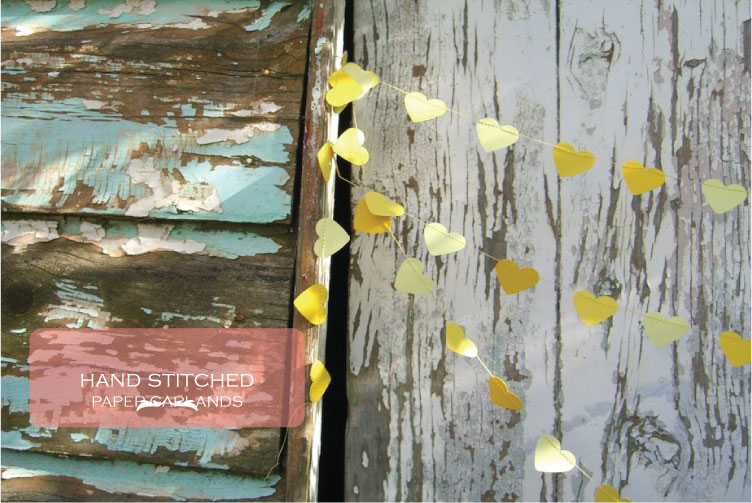
This seasons spring colours are warm, vibrant and we are loving it. This week has been the week for HOT PINK, with requests for custom made garlands, tags, spoons and notelets. Other colours high on the hit list are tangerine, yellow and navy.

Don’t forget, if you don’t see your event colour palette in our online store, we just LOVE working on unique bespoke designs to make beautiful your special event!

DIY Friday: Make a paper fan

Paper fans are so versatile. They can be used layered or tiled for backdrops, to dress the front of your table, or adhered to a stick as a centrepiece, even hung from the ceiling on fishing wire. So when we spied this amazing paper fan backdrop we asked clever stylist Vanessa Morris from Little Pear Events to show us how to make this versatile decor element. What you need: 2 x Cardboard (needs to be rectangle) A glue gun or glue Disk for the middle

  1. Start by folding a cardboard sheet in half (from the short end), fold again and then again (this means when you move onto the next step each fold is even)
  2. Fold out again and then fold in a concertina (folding forwards and backwards onto itself)
  3. Repeat with the other sheet of cardboard
  4. Now is the time to get your disk ready, in this one i just cut out a heart and glued it onto a doily then onto some thicker card stock
  5. Back to the concertinaed cardboard, use your glue gun to clue down one of the edges then quickly attach the other to this so it from a semi circle
  6. Repeat with the other side and glue so you have a complete circle
  7. Now glue the disk to the middle of your fan (be sure to position the disk so the top is aligned with the edge that wasn’t clued, this was will ensure when your fan hangs in doesn’t fold open.